


On creating a plant spell book

Curiosity is the greatest act of devotion. When we lend our attention and an open mind to a thing, we are allowing ourselves to be woven into the creative processes of the universe. This is where the earth shares its secrets, where we find hidden jewels within our own spirits.
Throughout history, we’ve documented these devotions for deeper understanding, as a sort of collection of thoughts and observations, and for those yet to come. From the sacred texts such as the Bhagavad Gita or the Ramayana to simple family recipe books and plant collections, all of these were created as a testament to this devotion to life and its mysteries. We can use these tools as ways to connect with and understand the language of the land.
I know many who read this newsletter are also seekers, artists, writers, so I wanted to share a bit of how I document my own explorations as inspiration.
Documentation can come in many forms:
Herbarium: a collection of dried plant specimens that are stored and cataloged by family, genus and species for further study. (Kew Gardens)
Nature Journal: a lens that focuses our attention and crystalizes our observations, thoughts, and experiences. Nature Journaling is collecting and organizing your observations, questions, connections, and explanations on the pages of a notebook using words, pictures, and numbers. (John Muir Laws)
Grimoire: spell books that contain symbols, incantations, charms, and instructions for invocations and the making of amulets. (San Diego University) I may also add that in general these are documents to record our more metaphysical musings, dreams and experiments.
Scrapbook: a storytelling tool that arranges moments from the past for future reflection. These are often made in a collage manner by cutting and pasting pictures, printed media and other design elements.
Silva Rerum: translating to “a forest of things” from Latin, this more obscure form of documentation was historically practiced by Polish and Lithuanian families as a multi-generational chronicle of anything from secret family recipes to poems, current events, philosophical musings, advice for descendants and economic or financial records. These were most often created in a diary-style format.
While all of these types of documentation take different approaches to their creation, they all seek to use a physical tool to express and connect with the intangible. Personally, I like to take inspiration from all of these forms. What I end up with is a sort of plant spell book with both practical and personal explorations of the world around me.
But there is one thing all of these records have in common, which is a blank book to contain it all. A few of my favorite options:
Moleskin Art Notebooks: the art collection made by Moleskin utilizes thicker acid-free paper than their regular line so that ink does not bleed through to the back of the page. They also come in different sizes and colors. he paper of this Moleskine object is made of material from well-managed, FSC-certified forests and other controlled sources.
Stillman and Birn Sketchbooks: these come in wire bound, hardcover and softcover for plenty of options. Many options for different sizes as well.
Field Journal: for something a little more personal, these hand bound sketchbooks come in a variety of bright colors. You can choose journals with blank or lined pages as well.
Watercolor Sketchbook: another hand bound option created in Ireland. These feature cotton paper pages and can be used for various media, not just watercolor.
How to draw plants
One form of documentation is through sketching. This is a very vague title for a very vast topic. Instead of an instructional, this is more of a starting point to thinking creatively. The goal isn’t to create a perfect carbon copy image after all. The goal is to capture the essence of a plant as well as the moment and place you are working within. First of course, you need a medium to work with. These are my favorites:
Tombow Markers: these are watercolor makers that come in various palettes with dual sides. One side is a brush tip which allows for broad expressive strokes, the other is a more fine tip for details and bold marks.
Prismacolor Colored Pencils: a classic for those who love color. Colored pencils are great for creating various depths of value, shading, cross-hatching and more. Don’t forget to also pack a pencil sharpener!
Neocolor Pastels: these wax pastels look a lot like crayons, keeping mess to a minimum. The bold colors and blending style of pastels allow for a completely different texture and feel from watercolor or colored pencil.
Micron Pens: the first medium I ever worked with for journaling. These pigment-based fade resistant ink pens are great for bold line work as well as for text. Everyone from artists, anthropologists, archivists, architects and scientists use these pens for documentation and record keeping. They also come in various tip sizes and colors.
This is really the extent of the mediums I use for my books. A lot of folks, especially nature journalists, love using classic watercolors, but I don’t love the mess and extra materials required for creating when I’m in the field. All of the mediums mentioned above can be easily stored and used quickly.
Here is a quick exercise to get you right into drawing and connecting with plants, for both the beginner and experienced artist.
Choose a comfortable place to sit for a spell and get comfy, maybe sit on a blanket or under some shade.
Pick one drawing tool that can create broad brush-like strokes such as the Tombow markers. Pick just one color, preferably a very light color. Then choose a drawing tool that can create finer details, preferably in a bolder color such as one of your colored pencils or an ink pen. You should only have two drawing tools for this exercise.
Pick up your broad drawing tool and observe the plant or landscape in front of you. Note the areas of the plant that are darker than the rest and begin to loosely create those shapes with your tool.
Don’t worry about being exact, in fact sometimes it’s better to not even look at your page as you draw, but rather keep your eyes on the plant. Let your tool wander around the page as you notice the areas that are light and dark and places where outlines are strongest.
We have a natural tendency to want to make things “perfect” or how our mind perceives something as perfect. But what ends up happening is that it just looks fake. Instead, take in all of the flaws and not-so-perfect parts of the thing in front of you as well whether it be wilted leaves, insect holes, or an awkward angle.Once you are finished you will probably have an image that doesn’t look much like a plant at all, though you may note some areas that have the gesture of a plant, a stem, a petal. This is perfect. This is the core essence of the thing you are observing.
Next pick up your finer tool and observe the plant again. Using your base drawing as a guide, begin to fill in finer details or gestures you want to highlight. This could be the shape of a stamen or the lines of a leaf. Again, don’t get caught up in what you think this should look like. Just simply let your hand draw what is there.
This two color sketch is a perfect starting point for working freely with botanical drawing. If you want, you can go in with more colors and work it further, though often these simple gestures are all a sketch requires. Letting a drawing be loose allows the mind to wander to farther places and make deeper connections.
Thank the plant of place for its time. Consider coming back and drawing here again at a different time of day or season to compare and contrast.


How to journal with plants
The practice of journaling with plants is a sensory one. You are trying to translate the sights, sounds, smells and feelings of a plant or place into words. It is a great medium on its own or as a compliment to drawing or pressing.
A simple exercise to begin journaling with plants:
As with drawing plants, find a comfy place to sit with a plant or place, perhaps on a blanket or under shade.
Begin by doing nothing. Simply close your eyes and let the world fall away for a few moments. Once your mind is quiet begin taking in the world around you unhindered by thoughts and movement.
Listen for bird calls, rustles in the brush, the breeze through the trees. Note any smells that make their way to you. Maybe the fresh smell of cut grass, the dying of leaves, the aroma of a flower. Feel how this place rests on your skin, whether you are parched or sweaty, calm or energized. Even consider the thoughts that may pass through your mind as you sit here.
After a few minutes open your eyes and focus on your power of sight. Hone in on the plant you are working with. Note any insects that are visiting its leaves, see how it subtly sways and moves, pick out all of the various colors in every part of its body, acknowledge any particular energy it is giving off.
Spend a good ten minutes or so just observing. Once you are ready, you can simply begin writing. Anything and everything that passes through your mind in this time period is valid. Maybe a memory that has made its way to the surface, a message from outside yourself, or even just how you are feeling in this moment with this plant.
If nothing comes to mind, you can start by taking a more practical approach and just begin writing anything you observe such as the number of petals a flower has, how tall it is, what the environment is like, what other plants are growing around it. You may find that these practical observations eventually lead to something deeper. Even if they don’t, you’ve still spent quality time with this place and yourself. No need to force anything.
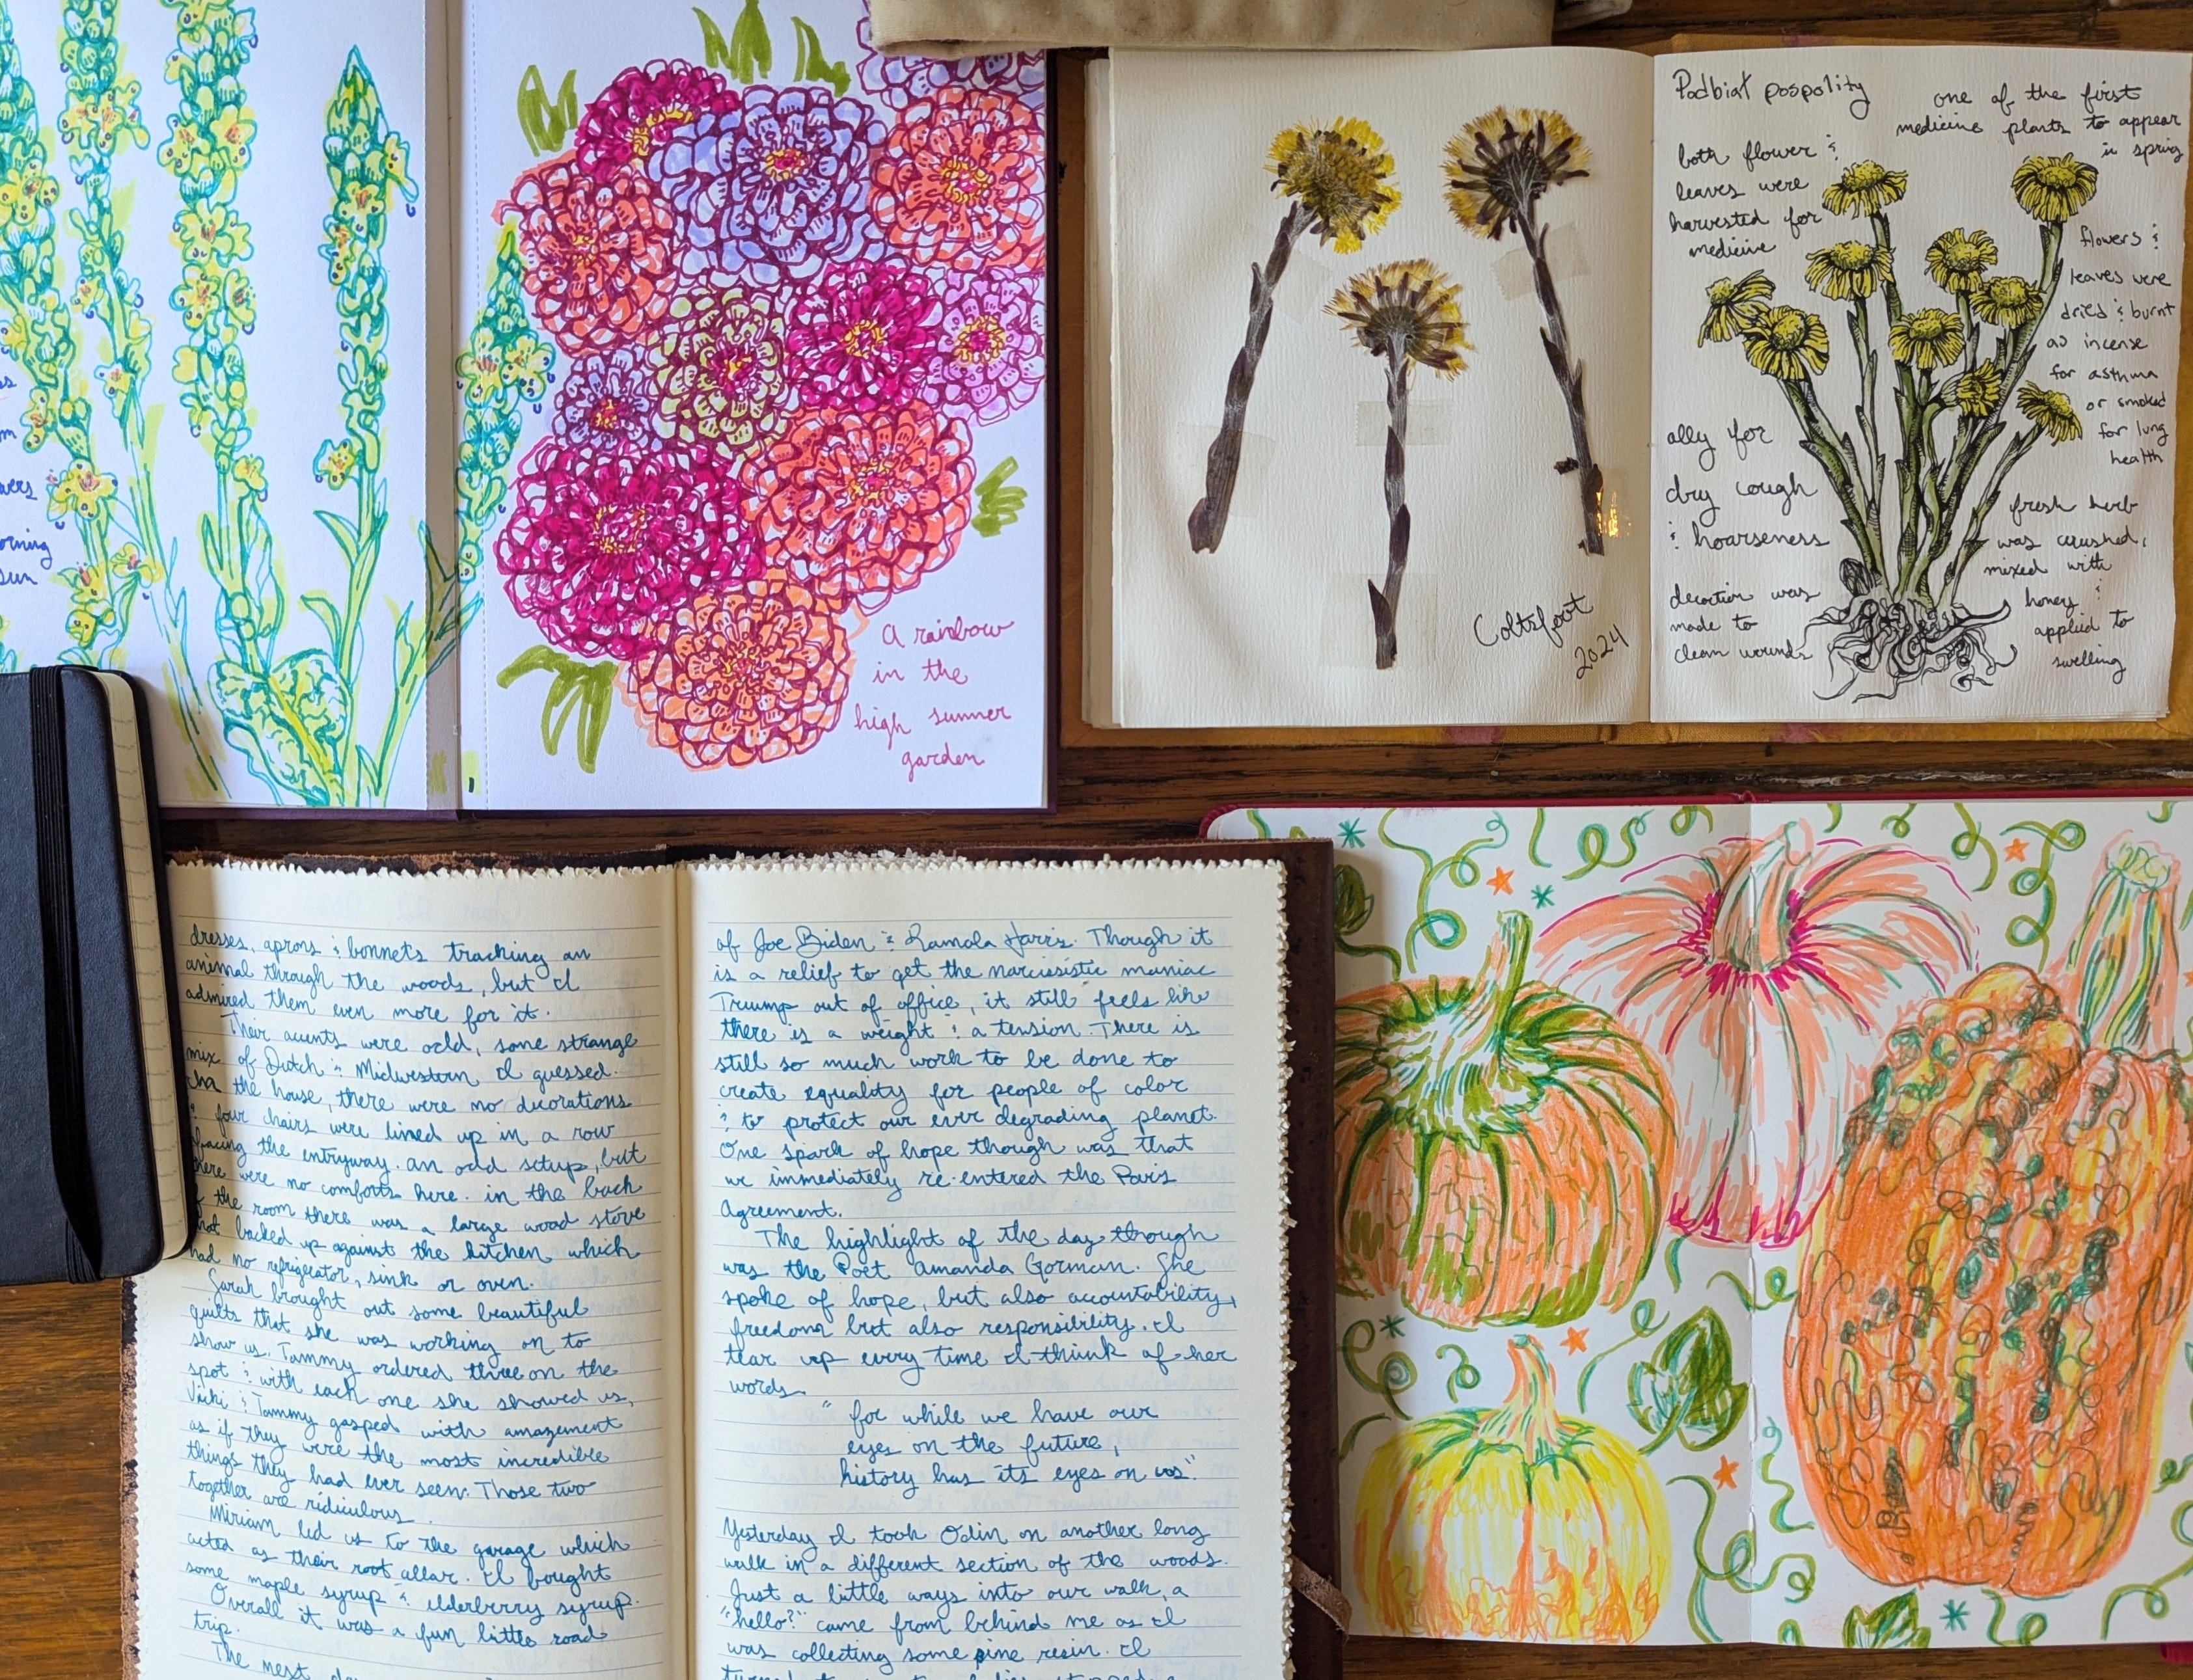
How to press plants
Aside from journaling and drawing, I also like to take a page from the herbarium format to include pressed plants and flowers in my books. When I’m sketching in the field, my aim is to capture the spirit of a plant. When I press plants, I’m able to preserve their physical anatomy and details. I feel like both go hand in hand for understanding the deeper workings of things.
Choose a method for preservation. You can use a heavy book that you don’t mind sacrificing as the pages may become wrinkled or smeared (though color and form don’t always stay in tact this way) or you can use a flower press. The ones I have in my shop are made locally with high quality hardwood and do a fantastic job at capturing the likeness of the live plant.
With either method, you will need paper to press the plants with. Blotting paper is the gold standard for pressing, though you can also use parchment paper or even a coffee filter. The goal of the paper is to absorb the moisture from the plant as it dries.
Collect your plant specimens. Its very important as with wildcrafting to only harvest plants that are in abundance. If you come across just a single orchid in the forest, it is best to simply capture it through words or sketching. If there are plenty of your chosen plants growing in the area, snip two or three plants with small sharp shears. Be sure to make an offering before you do this. Any shears will do, but if you want something small and compact to take on a hike, you may like these.
I like to press my plants as soon as possible before they begin to wilt (the Explorer Press is great for preserving in the field). If you have larger specimens though, try to keep them cool or in a small amount of water until you can press them.
Once you are ready, unscrew your press to reveal the cardstock layers. If they aren’t already, cut your blotting paper to size. The order of layering will go cardstock > blotting paper > plant > blotting paper > cardstock and repeat.
Now you will position your plants. Place them loosely on the blotting paper. Keep in mind that how you position them is how they will dry and be displayed so spread the leaves and petals out nicely.
If there are flowers involved, try a few different positions as sometimes flower heads can be bulky. You can do this by spreading the whole flowerhead flat so it is front facing, or folding it a bit so you get more of a side view. You may also experiment with trimming off excess plant material in places so that the flower lays flatter. This is the benefit of harvesting a few plants per collection so you can see what works.
You can even get creative by dissecting the plant and pressing each part separately. It can be really interesting to see what a flower looks like on the inside of its bloom.Place another sheet of blotting paper on top once you have your plants positioned and layer them between the cardstock as mentioned above. Screw the top of the press back on so it is snug. If you are using a thick book, layer it similarly between the pages and stack heavy objects on top for more pressure.
Give the plants two to three weeks to dry fully. You can check on them as needed, though it is best to leave them undisturbed for the entire drying period.
Once time is up, you can unscrew your press or open your book to reveal your dried plant. You’ll notice the blotting paper may still be a bit damp. Toss these sheets away. If you’re satisfied with how the plant dried, you can now add them to your plant spell book. Secure them with a clear acid-free (otherwise it will yellow over time) tape. For a more decorative option you can use wash tape. If you don’t like the look of the tape, try a pH neutral glue.
Finally, label your specimen with the date collected, species, family, and genus name, along with any other notes and observations you want to remember.
Other spell book options
My preferred methods of creating these books is through drawing, journaling, and pressing. But you can also add in snippets from newspapers, magazines, polaroids, brochures, or tickets in a more collage type fashion.
The Spell Weavers Club
If creating your own plant spell book and practice sounds like something you want to explore more in-depth, I’ve also created The Spell Weavers Club.
This is a project I’ve been working on quietly this year for my paid Substack subscribers! I’ve SO appreciated you all supporting my work and writing this year and wanted to create a little more of a formal structure for your benefits. This is what I came up with.
The Spell Weavers Club is a monthly exploration of a particular plant, place or broader theme to help deepen your connection to the natural world, its seasonal rhythms and your own creative spirit.
Once a month, you’ll receive an in-depth seasonal guide all about the theme of the month which will cover the lore, medicine, science and my own personal musings about the topic. This will be available to download as a PDF as well.
On top of that, there will be a guided writing meditation to help you begin moving into the topic in a more hands-on way. This will be an audio format.
Lastly, there will be a pre-recorded sketching video tutorial as I take you into the field to capture the theme through drawing. While this will be an intuitive exercise, I’ll also share practical drawing techniques to help you develop your skill. I’ll invite you to find similar places around you to do this exercise, but many reference photos and options for sketching from home will be included too as I know time is always an issue.
Through writing, audio, and video, my goal is to guide you deep into the language of the land and its lessons. Practicing each exercise not only will weave you closer to the natural world, but will also provide a deep wellspring of inspiration for your own creative endeavors as you move through the year.
Resources for further exploration and study will be included at the end. Plus, there will be an opportunity to share your work, ideas and words here on the newsletter as a community exercise.
I created The Spell Weavers Club for anyone who ever wanted to start (and maintain) a journaling or sketching practice, learn about the medicine of the plants and land on a more intuitive level, and live more presently within each season.
It is a perfect companion to the Lunar + Seasonal Planner, but can also be practiced separately.
If you are a paid subscriber (or choose to become one) this is my big thank you to you. I’m looking forward to working through the land-based year with you. If you are a free subscriber, thank YOU as well. Every like, comment and share really means so much. You’ll still receive plenty of free newsletters from me.
The first Spell Weavers Club guide will be coming out in a few short days on the autumn equinox as we dive into the medicine of the Apple tree, so keep an eye out for that!
Much love,
Val
If you want to move deeper into a seasonal land-based life, consider pre-ordering my 2025 Lunar + Seasonal Planner. Because learning to live in tune with the land doesn’t come from grand gestures or life-altering shifts, but rather from daily routines, devotions and observations of the land and how we relate to it.
This yearly planner weaves seasonal land-based practices with modern living so that you can live more intentionally and presently within every season of your life. It was created for the plant people, the land lovers, the gardeners, and the seekers to plan their lives around the rhythms of the earth as our ancestors have for thousands of years. More than just a planner, it is a practical yet spiritual guide to living, working, gardening, and celebrating in tune with the ever-shifting world around us.